Desertcart purchases this item on your behalf and handles shipping, customs, and support to KSA.
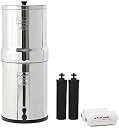
💧 Elevate your hydration game with the Royal Berkey – pure water, pure power, zero compromises.
The Royal Berkey 3.25 Gallon Gravity Water Filter System combines advanced Black Berkey and PF-2 fluoride filters to remove over 200 contaminants including fluoride and arsenic. Crafted from polished stainless steel, it offers a durable, elegant countertop solution that requires no electricity or plumbing. Ideal for households of 2-4, it delivers up to 6,000 gallons of clean water per filter pair, making it a cost-effective and eco-conscious choice for premium hydration.


| ASIN | B002R8ON3I |
| Best Sellers Rank | #66,010 in Tools & Home Improvement ( See Top 100 in Tools & Home Improvement ) #95 in Under-Sink & Countertop Filtration |
| Brand | Berkey |
| Brand Name | Berkey |
| Capacity | 12.65 liters |
| Container Type | Stainless Steel Chambers |
| Customer Reviews | 4.6 out of 5 stars 3,003 Reviews |
| Global Trade Identification Number | 00199284553002 |
| Included Components | System, Black Berkey® Elements, PF-2 Fluoride Filters, Spigot |
| Installation Type | Countertop |
| Item Dimensions L x W x H | 9.5"L x 23"W x 9.5"H |
| Item Highlight | Includes 2 Black Berkey BB9-2 & 2 PF-2 Fluoride and Arsenic Reduction Elements, Stainless Steel Countertop Filtration System |
| Item Weight | 9.7 pounds |
| Manufacturer | Berkey |
| Material | AISI 304 Stainless Steel |
| Material Type | AISI 304 Stainless Steel |
| Model Name | rb4x2 |
| Model Number | RB4X2-BB+PF2 |
| Number of Items | 1 |
| Number of Packs | 1 |
| Other Special Features of the Product | Chlorine Reduction |
| Part Number | RB4X2-BB+PF2 |
| Power Source | Gravity |
| Product Dimensions | 9.5"L x 23"W x 9.5"H |
| Purification Method | Unique Black Berkey® proprietary filter media |
| Special Feature | Chlorine Reduction |
| Supported Water TDS Level Maximum (PPM) | 1000 |
| UPC | 015975809145 199284553002 723794912754 798527624334 |
B**R
Excellent Product! Easy To Assemble Even For a Klutz Like Me!
My Review of the Royal Berkey with 2 black filters and 2 PF-2 fluoride filters. Everything I drink, especially tea, tastes better after a week or so of using this filter system. Installation was easy for me after I stressed out thinking it would be really difficult. I'm not particularly mechanical and I'm awful at following instructions. Before I ordered the Royal Berkey, I asked my son if he would be willing to put it together for me. I had read reviews of people having problems with leaky spigots and puddles on the floor, etc. He said he would. Good thing, because I had already decided to order it. It turns out that I didn't need any help. On recommendation of some of the reviews, I bought the glass Royal Imperial Berkey Water Filter Water View Spigot to help me know how much water is in the tank. Apparently if you fill it too full, it may leak through where the top (filter) section sits on the water storage canister. I'm very glad I did order the glass spigot. I'm finding it very helpful. While I was waiting for everything to arrive, I read every review of each model. I got some great ideas! I used many of them. I'll share some of the ones that helped me most here. I decided to take it very slowly, step-by-step, and do each step correctly the first time. That's not my normal style, but the slower, cautious approach paid off for me this time. Nothing got broken during the installation. I briefly looked over the instructions that came with the unit and decided to come back to them in a few minutes when I was ready to put the system together. I viewed the YouTube videos of how to PRIME the filters. VERY helpful! Also helpful was one reviewer's comment about how you will get sprayed with water. I thought I could avoid that if I was careful, but I got semi-soaked. It was kind of interesting watching all that dust and debris rush out of those filters and down the drain. After viewing the YouTube video, I went back to the instructions that came with the unit. It was much easier after having seen it done on the video. Installing the canisters was easier than I thought it would be. It was fairly obvious how to install the BLACK canisters, just just stick their little stems through the holes in the bottom of the top stainless steel tank, but I had trouble finding the instructions on how to install the white ones. I somehow missed those instructions or didn't understand them. I Googled YouTube again and had an 'Aha!' moment. Very easy once you know that they hook on below the black canisters. I was thinking they fit in one of those other slots. There are little ARROWS on the canisters that point up, so it's easy to know how to connect them. There are 4 slots for canisters, and only 2 black canisters (with 2 white canisters hanging on to them). That leaves two extra empty slots. Something has to be in those slots or the water will just gush through, defeating the whole purpose. It took me a few minutes to figure that out, the hard way, so I filled the tank with water, which just swooshed right into the containment (storage) tank, without ever touching very much of the filter canisters. The water went through so fast it was obvious that it didn't filter anything. It didn't even make good contact with the filters. Then I remembered the PLUGS I had read about and had tossed aside earlier because I didn't know what to do with them. I took the plugs and plugged them into the slots that didn't have filters attached to them. Then I put water through again. The water didn't drain straight through. It filled the tank as it was supposed to do. THIS time I could hear the water draining through, but very, very slowly. At that rate it would take a couple of hours, or more, for all the 3 gallon or so of water to filter through. That was what I wanted. When I installed the spigot, very carefully so I didn't break it or ruin the threads, I tested it by filling the storage canister with water. I noticed just a smidgen of water around the spigot, so I went back in, unscrewed it, and screwed it back. Apparently I hit the "sweet spot" as another reviewer put it. No water seen around the spigot since then. I'm especially glad I got that "Water View Spigot." It has already been helpful. I can see that it will pay for itself. I moved my filter system around, first on top of a higher 'bar' counter-top, but that means I have to get a step-stool to fill it. Then I put it so it would drain into the sink, 'just in case', but I couldn't fit a container under the spigot very easily. I moved it to the edge, so that the spigot hangs right over the edge of the counter, but I didn't like how it looked. I moved it back on the higher 'bar' counter-top. That works fine for me because it's easy to get the spray faucet and fill it that way or climb up and fill it every couple of days as needed. After using it for a couple of weeks, I've found that I need to fill it every 3-4 days. I hope some of my experience will be helpful to someone. I had fun doing this, and I'm the world's worst at assembling things. If you are like me, an uncoordinated klutz, just plan it out, do it slowly, step-by-step, doing each step correctly as you go. It's really easy, and fun. I'm really pleased with how it filters the water.
S**E
American Berkey with Black Filter and PF2 Filter
Reason I chose this filter system was because we use well water (hard calcium) and ended up having to purchase water throughout the year especially after heavy rains and when the power goes out obviously our well pump does not come on; we live in Central Indiana and sometimes are under tornado watches and having drinking water did play a factor in my purchase consideration. It was packaged well, they sent this item right away, one piece was slightly dented but nothing serious and everything was included – up till I received this in the mail I had no realized I needed to use all 4 filters; so it is best if possible to order a backup set of filters. With that said the British Berkey system comes with white ceramic filters and PF4 filters so I chose this ceramic filtering system as my back up after I am done with the Black filter system: they are cheaper and it was originally the system I wanted. They can be found on Amazon, and had I looked harder could have ordered the Berkey system without filters and the ceramic separate but do not regret the Black filter purchase. Followed the instructions which were easy to read and when it came time to drink my first glass of water I was impressed: it tasted like clean water. My husband who is fussy with water drank some as well and noted the coffee tasted better than with the ‘distilled’ water we had been buying. We do not drink bottled water so I cannot speak to the difference in tastes in that regard. After a few hours the nozzle started to leak and all I did was tighten it some more while it was on the Berkey system, putting it together I might have been hesitant to tighten it too much, but since has not leaked. So when first putting this system together do so with a towel close by just in case. The nozzle compared to the force of a tap is slower but that is expected. It is a higher price point item than I would normally buy but after looking around for a year and reading reviews outside of this site (and considering a home filter system but again power outages and tornadoes a factor) I am confident in my purchase and my ability to clean and care for the system (filter cleaning and care) and with options of changing the filters to the ceramic when I choose. As of today I would recommend it and update this entry if anything changes.
O**Y
Connect To Home Water Supply to Auto-Fill Your Berkey (A DIY Project)
For filtering, 2-Blacks & 2-PF-2's (4 filters) this can not be beat. Be sure to order the Stainless Works SSS012 spigot replacement. The unit, if permanent, i.e., in a kitchen, is weak in one point.. it needs manual refilling. This was not acceptable, and the glass water-level spigot is not only expensive but does nothing to solve the fill-it-by-hand inconvenience. Overcome this glaring problem by modifying the unit to Refill Automatically. [Any Warranties by any MFG involved will obviously be VOIDED]... but this Mod works! Here is the very basic method we used to accomplish a finished working Berkey Auto-Fill unit. 1- Locate a Adjustable Mini Float Valve For Aquarium RO DI Reverse Osmosis System on Amazon or eBAY etc, and enlarge the Berkey lid hole for the float threads to poke from the inside to the outside. The float will be hanging in place, attached to the lid. The lid center-hole is drilled larger to fit this top float-valve, with the valve water inlet protruding through the top of the lid, and the float hanging under the lid. (effectively the float hangs downward into the Berkey's top can. To drill the center-hole larger, cover the Lid with seran wrap or such, on both sides, to protect the finish... (any twist or abrasion may, will, mar the 'mirror' finish of the chrome look). 'Sandwich' the lid with 1/2'-inch or so wood blocks top and bottom, (having pre-drilled a pilot hole, the size of the lid-hole, and line up the wood with the existing lid hole...C-clamp wood in place with reasonable torque. After lining up the lid's hole and two clamping blocks, use standard metal drills, (three sizes and oil, up to finished dimension to fit the valve hole needed to install the float-vale). 2- Drill a screw hole to thread, on each side of the lid, for a small screw, size-6?. A screw goes on each side of the lid. The lid hole is large enough for the two screws to easily fit through. The two receiver holes in the side-wall of the Berkey must be drilled with a proper 'tap-drill' size to fit the 'fine-thread' of the 2 chosen screws. These two screws will prevent the lid from 'lifting' when the water in the top chamber lifts the float ball high enough to shut off the incoming water flow/pressure. The float should stop the water about 1.5 inches from the top lip of the upper tank. (A float-valve will general handle 60 p.s.i., but we had pre-regulated our pressure down to 40 p.s.i for a prior filter system, so we left that control in place for this Berkey DYI project). Remember, the Berkey cans are a thin metal, treat the 'threads' with a light-hand so as not to 'strip' them out. You are NOT tightening the screws, you are ONLY 'holding-down' the lid, pinning-it, so it cannot rise against the pressure of the float. Do NOT seal (air-tight) the lid to the top can. Do NOT seal the bottom can to the top can. Just let them all sit, together, as designed. 3- Coming off the top of the LID, (with a copper 'Ell' adapter), the float-valve is fitted from the inlet to a 1/4 compression soft-copper pipe, connected via a 'compression-Tee' to either the Sink or Refrig. water supply inlet. With the float in place, the LID screwed on, and copper tubing connected (but not as yet turned on), this completes the Top Tank portion. Auto-FILL is no longer a problem. 4- Now the Bottom Tank has to be fixed, to have the incoming filtered water stopped, before it overflows. To achieve auto-SHUT-OFF, a second float is needed to be installed, inside the LOWER Berkey tank. Do not use a second Mini Float Valve for the bottom tank, as the mini-float is too small a float to properly work in the lower tank. Instead find a new plastic (or) copper float-valve unit that is designed to control the water level of a Evaporative / Swamp Cooler's water pan. This would be found as a 1/4-Inch Compression Evaporative Swamp Cooler float valve. This Cooler "float" is large, but not overly large as the float will be fit Vertically in the center of the lower tank, even if the Berkey has 4 filters installed. This larger size of float is "needed" to properly cut-off the water flow to the bottom tank as it fills. (The float bobs VERTICAL in the center of the tank, but the valve itself wants to be close to the tank's bottom, thus the hoses support the valve down near the spigot) 5- One short piece of medical-grade (clean) rubber (or) plastic tubing, exits out the bottom of each of the two PF-2 filters, and the other end of each of these tubes joins into a plastic (or) metal 'Tee' making a completed loop, water dripping from each PF-2 filter, out and down their rubber tubing into a Tee, and continuing down into the bottom float-valve. The lower PF-2 filter's (water exit holes), are not threaded. (You may attempt to carefully thread the PF-2's for a hose/adapter attachment if you have the proper tap and hose adapters but contamination may result without careful forethought). The method we used, considering only 'gravity feed' pressure is exerted on the filters into the lower tank, is to slip a tapered rubber plumbing washer over the two rubber exit hoses, and use that slip-fit (jam-it-in-fit) to hold the rubber pipe into the bottom end of each PF-2 filter. (If you use this rubber hose/rubber tapered washer method, it works because the PF-2 exit hole is also slightly tapered. Still, the tubing, rubber washer and filter hole must all fit firmly together!) We located a couple of almost-right tapered washers, (hardware/plumbing store), and with pencil in the washer hole as an 'axial', hand ground the washer's taper minimally to actually match the PF-2 taper, for a very firm and snug, hose inserted fit. If using this method, get more than two washers (to practice with), and be sure NOT to jamb the HOSE up-into the filter material of the PF-2's. NOTE TO SELF: If either of these hoses exiting from the PF-2's pop-off or fall-off, you will bypass the lower water cut-off float valve, and you WILL OVERFLOW the lower tank. These hoses MUST stay connected firmly to the filters...and not leak!) 6- Piping continues from this PF-2 Tee with a short piece of rubber/plastic tubing that has been pressed over a 1/4" soft-copper piece of tubing, (the rubber to copper are clamped together with a zip-tie), and the remaining end of copper pipe is compression-fit to the lower float-valve. The lower Valve is held in place by the mildly stiff hoses, Tee, and copper tubing. Basically, the valve is suspended by this "plumbing". To counter 'torque' from the float wanting to 'pull' the valve up, insure that the combined hoses, pipes etc, will keep the valve in place (horizontal), when the float is pulled up to it's shut-off point. If this cannot be accomplished by piping alone, and the valve itself want to lift, as in our case, then we used two tempered (stiff) wires extending from the valve's nut and up to the two hole-plugs for support. You may find another method, for instance a bracket from a hole-nut, down to the Valve, to hold it in place horizontally, or some other method, that still allows all the added plumbing and valve to be 'attached' ONLY to the top tank, so that when the top tank is removed, all the modifications will stay intact with the top tank, and nothing is connected to the lower tank. By design, the two tanks can NOT be locked together, you'd have no access. 7- This is the other 'hard part'. The Evaporative/Swamp cooler float-valve is a standard 1/4" copper compression valve, and no problem to acquire. The trick is that all float-Valves connect to the 'Float' via a copper (or) plastic rod, and that connection (between the two), must be modifiable by you. The LOWER Float MUST be able to unscrew off of it's rod or plastic valve shaft. If you get a valve with a Brass rod, that rod IS threaded into a Plastic-Float, and WILL just unscrew off. You must be able to 'disconnect' the Valve from the actual Float. The reason is that the float must come to rest about 2-inches from the top-edge of the lower tank. That's about 8-inches or more away from the valve it needs to control. A stock rod will either not actuate the valve to shut off properly for this application, or the rod will just not be long enough to be bent to vertical, and then reach up to were the float must come to rest when the tank is full of water, (and thus pull the valve closed). (We bent our (brass), float-rod so that it pointed up, in the center of the lower tank, and we insured that when this rod was pulled "UP", the valve would be in it's Shut-Off position. ( Do not make a mistake on this... PULLING ROD UP is OFF! Test it by Blowing Through The Valve! ) 8- We needed a 'extender' to connect the end of the rod to the Float. You will need to find a way to bridge/connect the float and valve also. We used a float chain (either links or the little balls variety), such as you would find in the "clean" water tank of a toilet, to, with the handle, lift the rubber-flapper, to flush the toilet... that kind of chain. One end of the chain connects to the lower fill valve's rod, and the other end to it's float, up at the center of the Berkey tank. A problem to overcome.... The float goes up and down, dependent on either filling (open valve) or full (closed valve), as this float controls the valve opening and closing. This Float movement is only 1-1/2 inches or so, (of rise and fall) to actuate the Valve linkage. However, if you, for instance, "drain" (or near so), the lower tank's water supply into a 'big pitcher', the float will free-fall (now on a 'loose' chain), and hang down inside the tank, toward the bottom of the tank. If wrongly left like this, when the tank refills, the float may rise unevenly and 'hang-up' on the rod or valve bracket, or whatever, thus defeating the purpose of the float, which is to rise unobstructed (floating-up). If the float fails to rise properly, it will certainly fail to Shut-Off the valve, fail to shut-off the incoming water flowing/filling into the lower tank ... If the Float is obstructed, you will have a flooded floor as the lower tank will overflow! So... insure that the float can only 'drop' 1-1/2 inches. When the water-rises, the float will lift, unobstructed, to its proper (shut-off) level. Use your imagination to accomplish control over the floats vertical movement. We decided to use very heavy-duty Glide 'dental-floss'. Yeah.. funny...we know. Others will undoubtedly come up with a better ideas... and we'll happily borrow them! :-P So we latched floss-lines from each PF-2 bottom nuts down to each SIDE of the float, and at the MIDDLE of the float (it's waist-line), with enough 'slack' that the float would be allowed to 'drop' only the 1-1/2 inch, before being 'suspended' by the two limiting strings. You don't want the float to flop-over when in its 'loose' state, so experiment attaching your float so it remains in its natural working position. (In this (Berkey) application, the float is NOT Horizontal. This float is "bobbing" Vertically, (chain-down), as the water rises and falls. When every thing is 'suspended, (you hold the lower float up, and the top of the float is about 2-inches below the lip of the can closing the valve, and it drops about 1-1/2 inches and the valve smoothly and natural opens with no binding, your ready to go! 9- If you got this far...(insure the LID is screwed on with the two screws lightly), turn on the water, check for copper line leaks to the LID float. You will hear the top float filling the upper tank...after some minutes, (you did soak the upper/lower filters with water to prime them, right?)... you will hear water that has penetrated the upper (black) filters and passed through the lower white PF-2 filters, through the rubber/plastic piping and joining 'Tee', into the lower float valve, and you will hear water dripping from the float valve into the lower tank. If you did it right, the lower tank should fully fill from empty to full, in under 1/2-hour, (you will/may hear the upper float-valve 'hiss' as it tries to reach the water stop point, since filling we have not heard that again), and when full, with normal household use you will be ready with water at any time with no further thought. If you do not hear water slowly filling after 10-min or so, consider a restriction in the lower plumbing, or the lower valve being upside-down, installed wrong and actually STOPPING water from filling. 10- Thoughts on Priming Filters and such: Well, Burkey suggests "cleaning" the lower tank occasionally so they expect some maintenance. This I suspect is because people, including Berkey, believe that a couple of minutes of "cleaning-priming the Black/white filters is satisfactory, but really the filters can/will pump crud out for some time, if not overly pre-cleaned. We found that placing a protective cloth at the bottom of a quart size wide-mouth canning jar for protection, and taking each filter, using the included rubber Berkey priming washer, putting a filter in the jar and using (we used the syringe).., the sink "sprayer" hose to force water through the filter. We could easily see that up to 10~15 'jar refills' were needed to adequately 'flush' the mfg particles out of the new filters. 4 filters=1 hour to flush, so that the water in the jar finally appeared 'clean'. The cleaner at the start of service, the better. HINT: If your normal 'tap' water is no good... buy 2~4 jugs of distilled water and use a big clean plastic syringe, (online or pet/vet store etc,), to force water through the filters, still using the included priming washer. Keep the filters vertical, and don't bounce them against the edge of the jar, or anything else! The 3~4 month 'checkup' for sediment/scum, whatever, is still easy to perform. Turn off the water, remove the TOP LID screws (don't drop them!). Drain the lower tank in the morning...drain the lower tank in the evening. Lift off the lid not bumping the upper float attached. Lift the upper tank high enough to clear the lower filters. Flip the upper tank upside down onto the counter-top. Wash the tanks and inspect the spigot for cleanness. Reassemble. Turn on the water. 1/2-hour later you have filtered water again. If the upper tank needs special cleaning don't bump the Black filters. If they Blacks need 'sanding' as per Berkey's instructions for reconditioning the filters, use a tooth-brush only and NOT a green-pad, it leaves 'green lint' all over the filters. None Of This Modification Is Understandable: For any who are challenged by these "written steps", consider drawing the two tanks, and sketching the inner filters, floats, piping, Tee, etc, as defined, to get a picture of what you need. Draw more or less to scale to make it easier to see the lower bracket dimension, and lower valve to vertical float height (and the connecting chain between them).... CAMPERS: The original purpose of the Berkey seems to be for outdoor camping use primarily, or if indoors, then it's used manually inconveniently... (obviously, our opinion). BUT, this Berkey, after your successful modification to make it Auto-Fill, is still a outdoor lover, at heart. To use, just turn-off the water source, disconnect the copper coupling from the LID, and SAVE the two screws. Presto! Your Berkey is again, camp-ready! Manual refill and all! When you get home, just reverse the uninstall, (if you can find the two little screws), and your back to Auto-Refill and happy wife, happy life!.
D**I
Goodbye Arrowhead
I purchased the Royal Berkey with 2 Black Filters and 2 PF-2 Fluoride Filters as a replacement for water home delivery. After years of having "fresh" drinking water delivered by Arrowhead Water, I decided I was tired of the hassle. Too many bottles, too few bottles, empty bottles piling up, and an inflexible management/payment system, finally pushed me over the line. Also reading up on "the need for regular cleaning of home water dispensers to avoid bacterial contamination" was a real eye-opener. If you are using a commercial water delivery system in your home or office, spend some time on the internet reading up on the reccomended dispenser cleaning techniques for safe water. This should be enough to make you RUN away from home delivery. The Royal Berkey with 2 Black Filters and 2 PF-2 Fluoride Filters is an amazing system. Once it is set-up it is a model of simplicity compared to bottle delivery. Pour tap water in the top and fresh pure water drips into the bottom. That's it. You never have to wonder how long your drinking water has been sitting around. The unit size is very manageable, and regular cleaning is simple and accessable. Setting up the unit will take about a half-hour for someone who is used to basic household projects. The instructions are poorly written and somewhat confusing (specifically concerning the washers and avoiding leakage). You will need to do your internet research, and make sure the spigot washer is TIGHT. Priming and cleaning the filters in the sink was kind of a squirty mess, but you only need to do it once. After you attach the filters, and screw on the little knob on top of the unit, you're good to go. There are plenty of Youtube videos to help you out. PROS 1. The quality and flavor of the the water is wonderful! Delicious, safe, and uncontaminated. 2. Very simple maintenance. The filters last for a very LONG time before replacement. All parts are accessible for cleaning in the kitchen sink. 3. Sturdy construction and simple design mean there is really nothing to break. 4. If you are replacing a commercial delivery service the unit will quickly pay for itself. 5. Attractive design. CONS Assembly is a little confusing, but is not that big of a deal. Even with the mildly confusing setup, I'm giving this product a full 5 stars. It's that good.
A**M
Simple design, no electricity, easy to use and maintain, and gives my great peace of mind!!
I waited to write a review because I wanted to know how long the filters would last during regular use.....so I purchased this Royal Berkey in June 2016, and it is now January 2017. So, after seven months I began to notice that it took longer for the water to filter through. I called the company and was very pleased with a knowledgeable and very helpful associate. He suggested that I remove all the filters ( I had two regular charcoal filters and two fluoride filters), clean the unit carefully, and remove the filters. The black filters were slimy feeling, so he suggested scrubbing them with a rough sponge, not using anything but water to rinse them, then re-prime all four filters. This worked like a charm!! I was not really wanting to replace the filters just yet, as they are quite pricey. So, to make a long story short, I am 100% satisfied with this product. I will order replacement filters in another three months as is suggested by the manufacturer. It gives me great comfort to know that heavy metals and fluoride are removed from our water before consumption. I am convinced that fluoride is toxic, and should not be in our drinking water! It has been declared a neurotoxin by the Lancet, England's top medical journal. No other country beside the US adds fluoride to the water supply. There is no arguing the skyrocketing increases in cancer, ALS, Alzheimer's, Parkinson's, and autism ( just to name a few!). I am certain that what we are eating, drinking, and breathing have to be responsible. Whatever I can do to minimize my family's exposure I will do. That includes our pets. When I was a child, cancer in animals was extremely rare. Now it is a common occurance!! Every day I hear of someone with a cat or dog with a new diagnosis of osteo-sarcoma or leukemia. Both of my dogs are on a grain free, GMO free, fish and vegetable diet with the addition of an occasional serving of organic fruit or eggs. Now I can give them fresh fluoride free water. Why would anyone want to give their dogs fluoride?! or heavy metals!? It's just insane when you think about it.
A**R
Amazing
The Berk was the Buzz at my Massage Therapy clinic. Everyone was saying how amazing the water quality was. So I saved up and took the plunge. I am thrilled with it. The water quality is excellent. In a Time where so many are being diagnosed with Cancer and many so young I some times wonder is it in the water? My parents both drank water from the Florida Tap and both died of Cancer where there was no Family History. My husband's family all drank the water from the tap and all but 1 have been diagnosed with Cancer. I have used my royal berk now for many month's and have tossed my water cooler as I do not drink water straight from any tap not even at restaurants it's always glass bottled. Anyway so thrilled by the Royal Berk I ordered another one for my Lake House. It is a bit pricey but well worth it along with peace of mind. Take the plunge you wont regret it. :)
M**N
Good quality but needs some improvement
The filter is very sturdy and the water quality is great. The taste was weird on the first days but I guess it was because of the new filter. It tastes great now. Installment has many steps and took us over an hour to make sure everything was right and also we didn’t want to contaminate any parts. Our biggest complaint is that you cannot fill the filter if it is not completely empty, otherwise it will leak A LOT. It caused us problems a few times and the floor was completely soaked in water. It’s very annoying because we need to wait until we are out of water before we fill it again. Anyway, an unexpected and annoying issue for such an expensive filter. At least it doesn’t take too long to filter the water so we can manage it.
Y**R
Best water I can ever remember drinking in my life
Why did I wait so long? I wouldn't have waited til Christmas if I had known what I was missing all year. It's a little investment up front but it's a few cents per gallon after that. The preparation and assembly went flawlessly. Now that I've assembled it and started using it, it's a better design than I thought it was, and I already believed it was one of the best before I bought it. I used Berkey customer service for an issue I had with shipping damage and I was happy to find real people at Berkey who care about their products and customers. I'm already attached to my Berkey and wouldn't want to be without it for more than a day or two. I'd buy another one in a heartbeat, and another one if I lost those. I expect this one to provide many years of service based on materials and design. One of my best purchases ever on Amazon and this is one of my most enthusiastic reviews. Truly clean water every day is so subtle a lifestyle change, and yet so profound. If anyone is serious about their health, the water they drink every day should weigh heavily into any protocol to cure, heal and maintain wellness. Congrats to Berkey for doing what they do so well. Notes: Read the instructions before assembly and follow all directions. It's very quick and easy to do. One caveat was that I had to prime the fluoride filters several times (in two minute cycles) to prime them completely so the priming and assembly process combined took a few hours (taking my time on my first time), but the end result couldn't be more worth it. The stand is a great accessory and almost necessary if you want to sit your Berkey back on a countertop or table. If anyone produces a stainless steel spigot with a stainless steel sight glass for this filter, I will buy it immediately.
C**H
un gros investissement mais aucun regret, c'est super, après un souci technique
Nous avons d'abord reçu un Berkey avec un défaut de la cuve au niveau des robinets. Pas de souci, remboursement immédiat et on a racheté une unité. L'installation est un peu laborieuse car il faut préparer les filtres et franchement le petit outil fourni est assez nul. Mais passé ce cap, super. Ce filtre est à gravité donc il fonctionne sans électricité et c'est ce qu'on cherchait. A vide il est léger et facile à transporter et franchement il a un super look. Par contre il est lent donc il faut anticiper un peu. Et les cuves restent toujours un peu remplie. Niveau entretien, il faut nettoyer les cuves une fois par mois comme une vaisselle normale et les filtres noirs une fois tous les 6 mois pour une durée de vie calculée d'environ 10 ans vu notre usage. La qualité de l'eau annoncée en sortie est géniale mais surtout on peut partir d'une eau de qualité moyenne type rivière inconsommable à la base à cause des pathogènes et de la pollution. Si plus d'eau courante, on pourra traiter l'eau du toit. La cuve supérieure sur ce modèle possède 4 emplacements pour accommoder soit pour mettre 4 filtres noirs, soit deux filtres noirs et deux filtres blancs à fluor mais c'est prévu pour les USA qui supplémentent l'eau en fluor et nous n'avons pas ce souci (en prime ces filtres se changent plus souvent). Les filtres noirs coûtent 150 euros environ pour deux. A l'usage, il nous coûtera 15 euros par an environ pour le fonctionnement. On ne regrette pas ce lourd investissement qui nous rapproche de l'autonomie et nous protège des difficultés. Super achat, vraiment ravis.
H**N
My first Berkey. Excellent product, lifechanging. Never going back to tap water.
I don't have much time to leave reviews these days, but wanted to congratulate Berkey on an amazing product! I disliked the taste and smell of tap water (based in Wiltshire, England, UK. Its most likely far worse elsewhere!) and specifically the heavy smell of chlorine. During the "covid era" farce of the past few years (I don't have a TV license, missed the whole show it seems), my remaining trust of water, food and health services has all but diminished and I hated the idea of consuming bleach (chlorine!) After much research I came across Berkey. I decided to take the plunge and invest £500 into a Royal Berkey, the stand and other accessories. Yes,I know its not cheap but it will last many years and is a sound investment in your health. I did consider a used/return option which you can find on e b a y if you are on more of a budget. Do you trust the water companies to remove contaminants in the water? I don't...! It is a weight off of my mind. I am next to order the fluoride filters and hope to invest in a travel Berkey in the future. The water tastes pure- SO much nicer than tap water! And no awful chlorine smell. It was easy to set up and prime. Make sure you do it correctly and listen to YouTube tutorials as you go along. It was quickly and securely delivered through Amazon. Watch the water and be vigilant. Highly recommended.
A**R
Pure water
So happy with my Berkey . I filtered my already filtered water and noticed a remarkable difference the Berkey provides water that quenched my thirst. The water from the Berkey is smoother and way better tasting. Love it .
F**X
Bon achat. Je recommande
Nickel! Nous avons comparés beaucoup de marques différentes et avons opté pour celui-ci. Nous l’utilisons depuis plus de 6 mois et en sommes extrêmement satisfait ! Facile à utiliser, assez complet et filtre parfaitement
A**Z
I recommend it
I was given the wrong size at first, but customer service were amazing and replaced it to the correct order within days. The item itself runs well and tastes good.
Trustpilot
3 weeks ago
1 month ago