


100 sq ft Black Surface Mount Vinyl Ceiling Grid Kit
Product ID: 40207483
Details
- BrandCeilingMAX
- MaterialVinyl
- Size100sq ft Kit
- ColorBlack
- Finish TypePolished
- StyleModern
📏100 sq. ft. coverage
🧩Fits 2x2 & 2x4 tiles
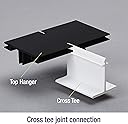
⚙️Snap-in, no wires
Buy anything from 5,000+ international stores. One checkout price. No surprise fees. Join 2M+ shoppers on Desertcart.
Desertcart purchases this item on your behalf and handles shipping, customs, and support to KSA.
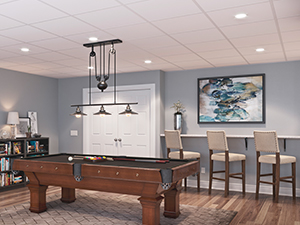
🏗️ Elevate your ceiling game—fast, flexible, flawless!
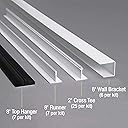
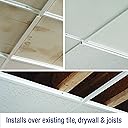
This 100 sq. ft. Black Surface Mount Grid Kit offers comprehensive coverage with 210 lineal feet of grid components, compatible with standard 2x2 and 2x4 ceiling tiles. Crafted from durable, rust- and scratch-resistant PVC vinyl, it features a snap-in design for quick, wire-free installation. Ideal for low-ceiling areas, it saves up to 6 inches of headroom and comes backed by a 25-year limited warranty for lasting reliability.


| ASIN | B004Q09MD6 |
| Best Sellers Rank | #263,678 in Tools & Home Improvement ( See Top 100 in Tools & Home Improvement ) #237 in Ceramic Tiles |
| Brand | CeilingMAX |
| Brand Name | CeilingMAX |
| Color | Black |
| Customer Reviews | 4.0 out of 5 stars 410 Reviews |
| Grade Rating | Residential |
| Included Components | Mount Grid Kit 100 sq ft. Satin Black Su |
| Item Dimensions | 97 x 3.5 x 5.5 inches |
| Item Shape | Rectangular |
| Item Thickness | 11 Inches |
| Item Weight | 18 Pounds |
| Item dimensions L x W x H | 97 x 3.5 x 5.5 inches |
| Manufacturer | ACP |
| Material | Vinyl |
| Model Number | 182-07 |
| Number of Items | 1 |
| Part Number | 18207 |
| Shape | Rectangular |
| UPC | 764890182078 |
| Unit Count | 100.0 Square Feet |
L**N
Good product, but a few tips
I've been using this for multiple rooms in my basement, roughly 1500sq ft. Here's a few tips: 1) Don't level the wall bracket separate from your floor joists. Push them all the way up to the floor joists, and shim if needed. Leveling them on the wall will cause your ceiling to look 'cupped' around the edges. 2) Install blocking behing anywhere where 2 top hangers need to meet. You won't be able to snap them in properly if you don't. 3) Install blocking behind the last top hanger, all the way across. Once you install the last tiles, you can no longer grab the top hanger to snap it together like previous rows. Installing blocking behind it insures you can push hard without moving the tiles. I wish I had known this when I started. 4) The formula they give is for centering tiles in a square room. Make sure to sketch on paper first and make sure you like the layout. Skinny rooms will fail their formula. A better formula is to take their formula and apply it to BOTH directions in your room, which guarantees you will be centered in both directions. 5) Buy cardboard construction shims to quickly bring joists in to level. Cheaper than thin stock and are fine for this application.
N**O
Decent product.
This is a great alternative to traditional drop celling. The instal is fast and easy and looks the same. A couple drawback the redgitity of the product making it difficult if you have large gaps to span. The biggest drawback though is the way the mounting strips a cut. The one foot on the ends really is a horrible design especially when the boarder is larger than one foot and working with 2x4 tiles. With the extra foot now you lose two plus feet off the 8ft stick. Unless you get creative with the ends and scrap. They should offer these in two cut styles one with the extra foot and one without the extra foot.
J**K
Zero clearance feature delivers
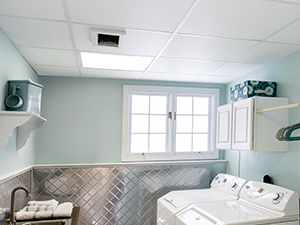
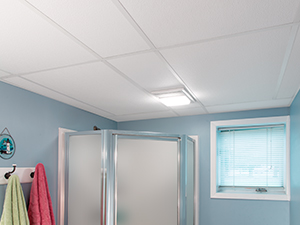
Easy to install, easy to get into later, looks great. I needed to install a drop ceiling in the basement laundry room and bathroom. I got historic tin ceiling tiles and installed the laundry room with a traditional metal system with a 2 to 3 inch clearance in the lowest places. In the bathroom I have a partial drywall ceiling and could not easily remove it all due to a 2x4 lower frame behind which I would also have to cut out to get a metal suspended ceiling in at a good height. The ceiling is already low so I did not want a metal system causing to be even lower. I opted for this system and it went in great. I had a shower dividing wall I had to go around but all the seams look great (no gaps or unevenness). I placed a ceiling fan in one tile and recessed lights in two other tiles with no issues. I still have to take one tile down to put in a heating vent grate, but I know that will be easy now...
E**S
Keeping the Headroom
I've used this product in the past and find it perfect to enable to keep the most headroom possible when putting in a drop ceiling.
J**N
Tough Product to Work With
Ok, the product is flimsy and under engineered. The specs to use this product are brutally tight, approximately 1/8". Next, the material that the grid is made out of has virtually no dimensional stability; it is like trying to straight line a cooked spaghetti noodle. Finally, the installation instructions and videos bear no relationship to reality. Now, I am making it work but the work is brutally slow to make everything work. Finally, do not try installing this alone as you will need a second set of hands. Finally, I do believe that when I finally get done with this "product" that I will have a nice looking ceiling. Finally, there are no spacers for lights, fans etc., so make your own.
S**I
Easy install
Easy install, great quality
M**.
Looks good. Not sure I'd do it again though.
I'm happy with the end result and there aren't many products for drop ceilings that don't reduce ceiling height. The install was not particularly easy though. The pieces are not fully rigid so having a chalk line or laser level for each piece is essential if you don't want wavy lines. The top track pieces are difficult to keep in place while driving screws if you don't have an extra person to hold them. Thicker acoustic ceiling tiles can be tough to get in, especially on the edges.
P**S
patience equals perfection !
I am very happy with this product. I have just ordered my third set for my house . I am done with my dining room and have 2 rooms to start . If you measure and mark correctly ensuring perfect right angles , it goes so much smoother . A dual laser level on a tripod can be invaluable .
A**N
Nice and quick
1. I received the package in advance according to planned date 2. Package content is A1 I will update if something's up that I didn't see yet, but so far, everything's great !
S**H
Works perfectly!
Slightly picky to get the last row of tiles in, but, this product worked absolutely perfectly for my extremely low roof basement! Once it's installed it looks awesome and the tiles are still relatively easy to remove if needed. We ended up doing the entire basement with these!
S**.
Happy with the result
Overall I'm pretty happy with the system. The concept is well tought, but could use some improvement. Runners are way too hard to snap, it's almost impossible to install between joist without supporting the top hanger. Also, like mentionned by other, this is kind of flemsy, so installing this alone was quite a challenge. My advice : take your time to make a perfect first line, then align a laser perpendicular with one define notch (in my case the center of the room). I found that marking a chalk line at 22-1/2'' from the previous line was the way to go. Those things are precise so if you're off 1/16'' it will just follow you the rest of the room. With the chalk line, you can make sure you are as straight as possible and if you have a little kink in the line, just cut the cross tee a little (tiles are quite loose, don't worry). Last thing, some cross tees are not flush to the runners, some are pretty nice, some are not, eventhough I made sure they were perfectly installed each time. I believe it's made from a possible twist to the hanger, I don't know. Thanks for selling this on Amazon, the package came perfectly and I'm glad my girlfriend likes the result ;) That's what's important right ?
A**R
Works well enough.
This product works best when your ceiling is fairly level. Mine wasn't and took a while to create level grids. The instructions say to start from the center of the room, but that would've made it difficult to level the ceiling. The only criticism I could make is that the black runners could've been designed better. They're notched for t-bar every 2 feet, and the notch starts at 1-foot in (from the end). I ended up cutting off to the first notch to fit my tiles. The grid and black runners are best spaced according to your tile's width, not the t bar length. Once it's snapped in, that's pretty much it. Solid. Took a while to get my uneven ceiling levelled out, but it looks as good as any other drop ceiling I've seen, and it's solid. If you want squared and levelled, it's going to take a while longer to get it right. They should have started the t-bar notches on the very ends of the black runners. Start with 2 foot notches, because every ceiling tile is a multiple of 2. I used 2 x 4 tiles, which would've put the first t-bar notch at 3 feet in had I not cut it. Odd way to do it, but I made it work. Good product overall. Having a complete kit is worth every penny. That makes this ideal.
D**S
Good for Drop Ceiling in Basement with Low Ceiling
This is the only product I could find to install a 1" thick drop ceiling in a low ceiling basement
Trustpilot
3 days ago
3 weeks ago