


Buy anything from 5,000+ international stores. One checkout price. No surprise fees. Join 2M+ shoppers on Desertcart.
Desertcart purchases this item on your behalf and handles shipping, customs, and support to KSA.
✨ Elevate Your Ceiling Game! ✨
The Zeta White Foam Ceiling Tile is a 40-piece box of decorative ceiling tiles made from high-quality Polystyrene foam. Designed for easy installation with most ceramic tile adhesives, these tiles can be applied directly over popcorn ceilings and are paintable with water or latex-based paints, offering a stylish tin-like appearance.


| ASIN | B00PR3IA84 |
| Additional Features | Moisture Resistant |
| Best Sellers Rank | #685,692 in Home & Kitchen ( See Top 100 in Home & Kitchen ) #120 in Hanging Decorative Tiles |
| Brand | Antique Ceilings |
| Brand Name | Antique Ceilings |
| Color | White |
| Coverage | 40 square feet |
| Customer Reviews | 4.5 out of 5 stars 477 Reviews |
| Edge Type | Square Edge |
| Finish Type | white |
| Finish Types | white |
| Form Factor | [IN] Insufficient information |
| Installation Method | Glue Down |
| Item Dimensions L x W | 20"L x 20"W |
| Item Thickness | 0.18 Inches |
| Item Weight | 6 Pounds |
| Manufacturer | Antique Ceilings |
| Manufacturer Part Number | B00PR3IA84 |
| Material | Styrofoam |
| Material Type | Styrofoam |
| Pattern | Modern |
| Recommended Uses For Product | Ceiling Decoration and Renovation |
| Shape | Square |
| Size | 20x20 inches |
| Style | Modern |
| Style Name | Modern |
| UPC | 799632174493 |
| Unit Count | 108.0 Square Feet |
| Water Resistance Level | Water Resistant |
A**R
Dynamite!!! Great DIY project!!
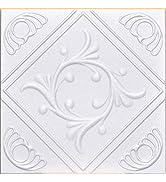
These tiles are fantastic! They look flimsy up close but when applied to the ceiling they are Dynamite!! If you are on the fence about doing this, order these now! I am from an affluent family with very difficult standards to satisfy. I ordered a hundred and thirty of these tiles for 400 and some odd dollars and figured if I don't like it I'll just throw them away and have the popcorn ceiling on a property that I purchased scraped and redone. I am so glad I went for this coffered look because this was something I did myself LOL in about 10 hours time! The look is elegant and classy and again if I can do it anybody can! Just place the tiles up with the palm of your hand, try not to smash them up against each other because they get more difficult to keep lined up, but if you space them consistently, they line up perfectly. They don't even have to be exactly perfect to look good that's the great thing, if it's off by a millimeter correct the next tile and move on. I did not use a chalk line because I have a staircase that I needed to start at on the first floor and had to use that as an edge instead of the center of the room. These tiles are forgiving and once up just look great! They also cut down on the noise... my room doesn't echo anymore... a great room with stone floors. Just watch the video... it is easy, just get a straight edge. I used loctite all-purpose grip that you can buy at home Depot for $3.78 or something like that. I don't generally leave reviews but this was really such a nice surprise. I have not been having the best luck with Amazon these days and finally I got a product that actually renews my Amazon Spirit LOL! I also spoke with the manufacturer and he was helpful as well but decided to order through Amazon to get free shipping. He offered a better price but it all evened out in the end! Highly recommended, you will have fun doing this and you will be amazed with the results! It's styrofoam if you screw on up you can just tear it off and start again, I didn't even have to do that. Just remember to order extra tiles because the perimeters of the ceiling all used part of a whole tile. So if you figure out how many tiles it will take on either side of the wall and you've got four walls then just take whatever that number is because you can cut them in half and use the tile ends on either side of the wall! Good luck!
P**Y
Wish I would have taken pictures of the before and after.
My husband and I were quoted over $1,000 for someone to come in and redo the drywall ceiling in our bedroom. After doing a google search I came across ceiling tiles as an alternative that was much more cost efficient. Not only did it cost us less than $400 bucks but our ceiling looks fantastic. For those DIY enthusiasts, this was super easy and took us less than 2 days to complete.
W**5
Great Option on a Budget!!
I was hesitant but absolutely love the outcome of these tiles! They are very thin, lightweight foam material but you can’t tell when they are up. I used crystal clear picture glue but not sure it was necessary to spend the extra money. I included a video of the completed project after I added wood trim and molding blocks to show that you really can’t tell these are foam. They look like high quality material and are easy to work with. Very satisfied!!
J**N
Great product
Excellent customer service. Love the tiles putting them up now and loving the look!
C**K
Beware...These Are Thin & Fairly See Through
These tiles arrived in good shape and were easy to install. I used Loc Tite with zero second grip technology and they stayed up no problem. However, we used them to cover the inside of our camper roof after rebuilding it and unfortunately, these are very see through. You can see the wood beams and writing on the foam insulation very clearly through these tiles, which I was not expecting and hadn't seen mentioned in any reviews. Had I known that, I would not have purchased these. If you are covering something that is all white, then these will work great, but if you are covering anything with color, the color will show through. I'm going to try painting them at some point and see if that hides the color. I will update when I get around to it.
J**A
I can’t believe how easy this was!!!!
I never leave reviews… but wow. I was nervous and skeptical but I’m giving these all the stars! At first glance they appear very thin- this is just styrofoam- but due to that they are so light weight and easy to hang! I used loctite power grab and only needed just a dab on each corner to hang them. Trimming them to size is super easy- have a square corner and measure, gently score and snap! Perfect line. I let the glue dry for a day and grabbed a can of ceiling paint and slapped it on- went on smoothly, an sooo easily- make sure it’s water-based paint and I recommend getting a high-quality roller, which will make your life even easier. All in all this entire project from start to finish probably took me by myself about five hours -maybe less!! I’m so happy how easy it was and made my messed up ceiling look great! For a DIY solution this is the one you’re looking for. Picture without the ladder is before paint with the ladder after
T**.
Didn’t work
I tried everything to get them to stay on the sewing and they just kept falling off they’re beautiful but not worth the money. Very easily breakable and are the same material of like the paper plates it seemed.
A**R
Home
They look great in my bathroom
Trustpilot
1 month ago
3 days ago